|
|
|
 |
Bends
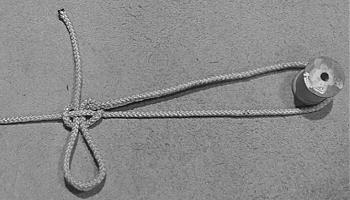
Sliding Sheetbend
The Sliding Sheet Bend is used for the same purpose
as the Tautline Hitch, but with a quick
yank of the end, it is completely untied. This is a boon for those wearing
gloves or who have cold, numb fingers. Moreover, unlike the Tautline Hitch,
the Sliding Sheet Bend can be "locked" in place to prevent it
sliding. It can also be unlocked to make it adjustable again.
For this clever
knot, I gladly give credit and much appreciation to Dr. Peter Suber, who
originally came up with this knot and posted it to the Web. I learned to tie this knot
using his instructions, and you can visit
his website for more knots like this.
|
Step 1 |
Wrap the end around the object it is to be secured
to (a spool in this picture). |
 |
Step 2 |
Form a bight in the standing part, pointing away from
the spool. |
 |
Step 3 |
Pull the end under the bight. |
 |
Step 4 |
Bring the end over the bight... |
 |
Step 5 |
...and form a loop. |
 |
Step 6 |
Now, form a bight in the end and stick it through
the bight in the standing part. |
 |
Step 7 |
If you are tying this knot flat as pictured, it helps
at this point to slide the bight in the end so that it is over the loop
formed earlier. |
 |
Step 8 |
Pull on both ends of the bight in the standing part,
removing the bight, so the standing part is straight as pictured. Keep the
knot neat while doing this! |
 |
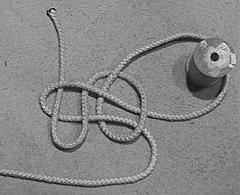
Finished Sliding Sheet
Bend |
Tighten the knot, so that the standing part forms
a "hump" as it passes over the bight in the end. This is what
creates the friction, and the friction can be adjusted by increasing or
decreasing the hump (by tightening and loosening the knot). |
 |
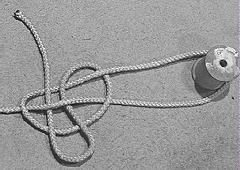
Finished Sliding Sheet
Bend |
This picture shows the knot having been slid further
up the standing part. Note that the rope had to move around the spool in
order for this to occur (like the Tautline
Hitch). |
 |
Locked Sliding Sheet
Bend |
Once you have adjusted the knot to your satisfaction,
it can be locked by tightening the knot by pulling on the non-sliding parts
of the knot. To unlock, loosen and flatten the knot, to reduce the hump.
To untie, simply yank on the end. |
 |
Click on the Piece of Eight to return to the Main Page
 |
|
 |
|
|
|